| Socket Style: | Socket 7 |
| Chipset: | i82430TX |
| Cache: | 512KB |
| Form Factor: | AT (w/ AT & ATX P/S Connectors) |
| BUS Speeds: | 50 / 55 / 60 / 66 / 75 / 83 MHz |
| Clock Multipliers: | 1.5x / 2.0x / 2.5x / 3.0x / 3.5x / 4.0x* / 4.5x* / 5.0x* / 5.5x* |
| Voltages Supported: | 2.1v / 2.8v / 2.9v / 3.0v / 3.1v / 3.2v / 3.3v / 3.52v |
| RAM Slots: | 4 72pin SIMM
Slots (EDO/FPM) 3 168pin DIMM Slots (SDRAM/EDO/FPM) |
| PCI/ISA Slots: | 4 PCI Slots 3 ISA Slots (1 Shared / 1 Full Length) |
| BIOS: | AWARD PnP BIOS w/ CPU PnP Setup |
| PCI EIDE Controller: | GiG I/O 2 EIDE Channels 1 FDD Channel 2 Serial /1 EPP |
* For future processors
"Expansion, speed, stability, and documentation, 4 areas in which the HOT-569 smokes the competition." Sound familiar? It should, since that statement was written only a little while ago, now what could Shuttle possibly do to improve an already excellent motherboard? Apparently, a little more than they should have.
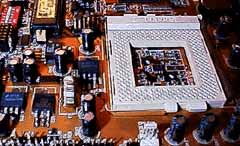 |
The HOT-571 starts out looking a lot like its 569 counterpart, boasting 4 PCI and 3 ISA which is pretty much average for an AT motherboard these days. In addition to that Shuttle managed to fit in 3 DIMM slots and 4 SIMM slots to give you a comfortable expandability buffer zone with the 571, and the positioning of all of these components can make the initial installation and future upgrades seem much less of a chore, even for an AT motherboard. Also like the HOT-569, the 571 supports the use of an ATX Power Supply if you happen to have an ATX case lying around instead of an AT form factor case it is designed for. Simply connect the PW Switch from your ATX case to the ATX PWR Switch pins on the 571, and use the built in ATX PS connector, its as easy as that. |
One of the major features of the HOT-569 was its ability to auto-detect and configure your CPU's core voltage without requiring any jumpers/dip switches to be toggled or messed with. The 569's AWARD BIOS utility even allowed the user to configure the Voltage Settings from within, without having to even open up the case. Improving on that philosophy, the HOT-571 not only allows the CPU's core voltage to be: 1) Set via Jumpers, 2) Autodetected, 3) or Set from within the AWARD BIOS Configuration Utility; but the HOT-571 goes as far as autodetecting the type of CPU present in the system! Meaning without having to set or configure any jumpers the user can pop in their CPU, hook everything up, and boot the system. All without having to worry about any problems associated with user error in setting jumpers etc... That is a major plus if you simply don't want to overclock your system, and just want it to function as it was designed to. The 571 test system completely detected and setup the AMD K6/233 as a K6-PR/233, the Pentium MMX - 233 as a Pentium MMX - 233, and the Cyrix 6x86MX-PR2/200 as a 6x86MX-PR200. The only reason I mention that is because the latter, the 6x86MX-PR2/200 actually has two possible settings for proper operation according to Cyrix and IBM. The processor can either be run at a 75MHz bus x a 2.0 clock multiplier, or a 66MHz bus x a 2.5 clock multiplier. By default the HOT-571 configures the 6x86MX-PR2/200 as a chip running at 166MHz with a 66MHz bus speed, and configures the PR2-233 as a chip running at 200MHz with a 66MHz bus speed. The PR2/166 is detected as being a Cyrix 6x86MX running at 150MHz with a 60MHz bus speed. So by default the HOT-571 never forces the use of the 75MHz bus speed, or any bus speed above the industry standard 66MHz. Just a warning to all of your 6x86MX users out there, don't trust the HOT-571's "intelligent" CPU settings since they don't always reflect the best setting for your processor.
|
Speaking of "intelligent" features of the HOT-571, the Socket-7 IC on the 571 is built around an intelligent CPU Thermal Sensor designed to monitor your processor's temperature during use and used to warn the user if the temperature of your CPU reaches a dangerously high level. Under the chipset features of the AWARD BIOS Setup Utility the 571 allows the user to monitor categories of system temperature and voltage as well as CPU fan RPM speed, the user also has the ability to setup warning flags if any monitored component behaves erratically (referring to temperature). |
The ease of use and installation of the HOT-571 is truly amazing. Since it is as close to a jumperless board as possible without having to actually be a jumperless motherboard and the actual setup of the motherboard doesn't require much more than the included Quick Reference card (a popular trademark of most newer Shuttle boards) the Shuttle HOT-571 earns full credit in the Ease of Use category. Although many argue that not having a full written manual handy is a downside, as long as you have the Quick Reference card and a bit of knowledge about motherboards and installation you will be fine. Otherwise call up a more experienced friend, find another computer with a CDROM drive and print out the included online manual, or email me for help =) The bundle with the 571 is classic of most other Shuttle mainboards, a CDROM disc which includes the most popular elements of any packaged software, a screen saver, drivers/patches for all Shuttle products (not just the 571 but their entire line!), as well as manuals and datasheets. Just a little token of Shuttle's appreciation towards their customers, something many manufacturers fail to understand, the fact that the relationship between the company and the customer controls almost completely the success of the company.
The performance and stability of the HOT-571...well...those two categories would unfortunately fall into "The Bad" section of this review.
In lieu of all of the "intelligent mainboard" features of the HOT-571, Shuttle seemed to have lost sight of two of the most important factors when designing a motherboard, Performance and Stability. Now the HOT-571 works perfectly at all clock speeds using the 66MHz bus speed, and when using one SDRAM DIMM it works near flawlessly when overclocking with the 75MHz bus speed. However once you use more than one SDRAM DIMM, regardless of the type, the 571 seems to lose all control over itself. The 83.3MHz bus speed setting might as well be left out of the Quick Reference Guide, since using it with more than one SDRAM DIMM is as close to as impossible as you can get. This is definitely NOT an overclockers motherboard. I managed to get the Pentium MMX up to 262.5MHz (290.5MHz was out of the question) however I only accomplished that after literally cooking the processor with a core voltage of 3.3v and it STILL failed Winstone! In spite of the 571's support for voltages ranging from 2.1v to 3.52v overclocking on the motherboard isn't too incredibly easy. And of course, the other downside to owning the 571 is its 64MB cacheable memory limit...once again, a flaw of Intel's TX chipset and not directly of the motherboard.
Allows user to individually set IRQs for each Legacy ISA card
Allows user to reserve IRQ/DMA Channels if necessary
Auto-detects PnP Cards after HDD Detection
Here are my Recommended BIOS Settings for those of you who have been having problems with the HOT-571 and higher bus speeds. Below are my recommended settings for bus speeds < 66MHz, and 75MHz. If you are using Non-EDO RAM (FPM), then use the settings the in the 2nd (Non - EDO) column, if you are using SDRAM/EDO RAM with a 50/60/66MHz bus speed use the 3rd (66MHz Setting) column. The next column should be used if you are using the 75/83MHz bus speeds and EDO/SDRAM. Finally, if you are looking for the safest and most stable setting, use the last column.
| Shuttle HOT-571 Chipset Features Setup | ||||
| Item | Non - EDO | 66MHz Setting | 75/83MHz Setting | Safe Setting |
| Auto Configuration: | Disabled | Disabled | Disabled | Disabled |
| DRAM Leadoff Timing: | 10/6/4 | 10/6/3 | 10/6/3 | 10/6/4 |
| DRAM Read Burst (EDO/FP): | x333/x444 | x222/x333 | x222/x333 | x222/x333 |
| DRAM Write Burst Timing: | x333 | x222 | x222 | x222 |
| Fast EDO Lead Off: | Disabled | Enabled | Enabled | Disabled |
| Refresh RAS# Assertion: | 4 Clks | 4 Clks | 4 Clks | 4 Clks |
| Fast RAS To CAS Delay: | 3 | 2 | 3 | 3 |
| DRAM Page Idle Timer: | 2 Clks | 2 Clks | 2 Clks | 2 Clks |
| DRAM Enhanced Paging: | Enabled | Enabled | Enabled | Enabled |
| Fast MA to RAS# Delay: | 2 Clks | 1 Clks | 2 Clks | 2 Clks |
| SDRAM (CAS Lat/RAS-to-CAS): | 3/3 | 2/2 | 3/3 | 3/3 |
| SDRAM Speculative Read: | Disabled | Enabled | Disabled | Disabled |
| System BIOS Cacheable: | Enabled | Enabled | Enabled | Disabled |
| Video BIOS Cacheable: | Enabled | Enabled | Enabled | Disabled |
| 8 Bit I/O Recovery Time: | 1 | 1 | 1 | 2 |
| 16 Bit I/O Recovery Time: | 1 | 1 | 1 | 2 |
| Memory Hole At 15M - 16M: | Disabled | Disabled | Disabled | Disabled |
| PCI 2.1 Compliance: | Enabled | Enabled | Enabled | Disabled |
| Spread Spectrum Modulated: | Disabled | Disabled | Disabled | Disabled |
| CPU Core Voltage: | Auto | Auto | Auto | Auto |
| CPU Warning Temperature: | Disabled | Disabled | Disabled | Disabled |
This little addition to my review layout was put in here just so you all can have an idea of what brand of SDRAM I recommend and have tested with the board, just to avoid problems in the future if you decide to purchase the board.
Recommended SDRAM: Advanced Megatrends SDRAM
SDRAM Tested: 2 x 32MB Advanced Megatrends SDRAM DIMMs; 2 x 32MB Corsair SDRAM DIMMs
Manufacturer: Advanced Megatrends
Purchase Web-Site: http://www.megacom.com
Manufacturer: Corsair Microsystems
Purchase Web-Site: http://www.nf-ny.com


0 Comments
View All Comments