Antec Solo II Review: Sonata Evolved
by Dustin Sklavos on September 6, 2011 12:00 AM EST- Posted in
- Cases/Cooling/PSUs
- Antec
- mid-tower
- Sonata
Assembling the Antec Solo II
While Antec has made a lot of strides in at least trying to make the Solo II easy to assemble, I'm not going to lie: I was pretty much dreading actually putting it together once I opened it up. Difficult assembly doesn't necessarily a bad case make (Ed: Says Yoda?); SilverStone produces some incredible cases, but half of the time you don't build them, you solve them.
Ordinarily I'd start by mounting the motherboard, but in the Solo II the absolute first thing you should install is the power supply. SilverStone's Temjin TJ08-E wasn't exactly easy to build either (top-mounted PSUs just seem to be problematic this way), but heaven help you if you ever need to replace your PSU once you've built a system inside the Solo II because you're just not going to be able to fit it around your heatsink. Thankfully the power supply went in alright, and Antec preinstalls most of the mounts for an ATX motherboard by default. The PSU and motherboard were pretty much the easy part.
Update: The Solo II ships with philips head screws attaching the PSU support bar on all sides, so you'll be able to remove the power supply without dismantling the rest of the enclosure.


Antec stashes the drive rails for the two 5.25" drive bays in the bottom of the case, a welcome change that keeps them readily available so that Antec's customer service doesn't have to gracefully send you free replacements (note: they've done that for me as a regular tax-paying ninja before I started doing these reviews). To install the 5.25" drive, along with anything using the 3.5" drive mounts, you'll need to remove the front panel. There are three levers on the inside of the enclosure that you press in, and the front panel actually swings outward on hinges. You're better off just lifting it off and removing it, though.
As much as I appreciate the rails for the optical drive, I've noticed they don't line up quite perfectly by default (you'll see in my completed build that the ODD is recessed), but the real question I have is why this isn't a tool-less installation to begin with. Virtually everybody else has graduated to a tool-less or near-tool-less mounting system for optical drives, but these rails are the exact same ones I installed on my friend's CD burner back when I assembled her AMD Athlon XP 2500+ machine. I wish that were an exaggeration. This needs to be updated desperately.
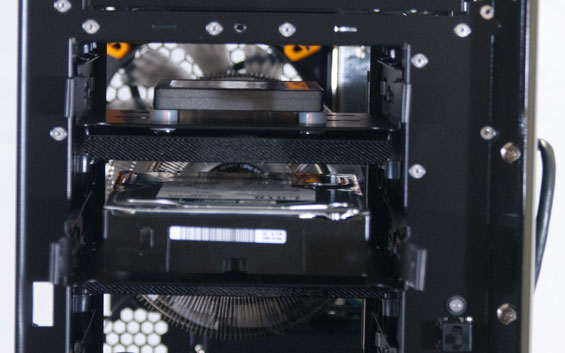
The press materials suggest hard drives are easy to install and upgrade, but don't you believe it. You have to remove the front panel, then unscrew a hinged ventilation grate (also capable of holding a 120mm intake fan) to get to the drive mounting system. From there you can either strap a 3.5" drive in with the suspension system (I'm not a fan), or you can remove the drive sleds and do it that way. I prefer the drive sleds as they include silicone grommets and can support both 3.5" drives and 2.5" drives. As a nice feature, you still use the grommets for mounting 2.5" drives, a reminder that 2.5" mechanical hard drives still exist (something other case manufacturers often forget), though we'd generally recommend 2.5" SSDs for desktop systems.
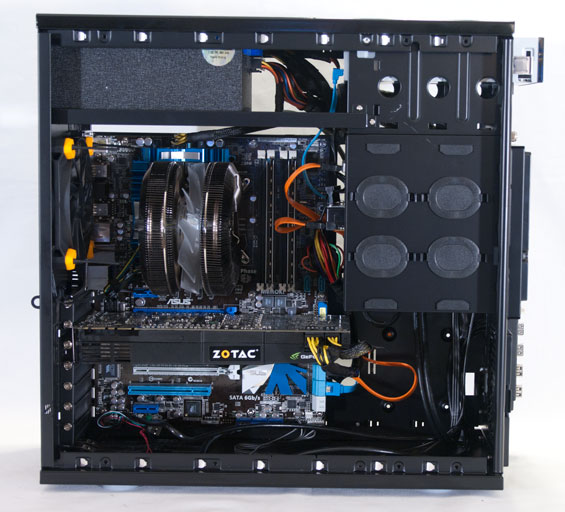
Finally, installing the video card was easy enough (as it usually is), but Antec uses old-fashioned screws for mounting instead of thumbscrews. Honestly I'm not sure I care that much either way; I'm terribly frail and generally just don't have the strength to twist thumbscrews unless I'm in a hurry, and I always wind up using a screwdriver anyhow. Cabling was a red nightmare, though, and again I have to stress: modular power supplies are your friend.
I'm keen to point out that SilverStone sent me a little dongle to try out and I've wound up using it in the last two case tests. This cable converts one SATA power cable into four in a neat line, and it is fantastic.


59 Comments
View All Comments
DrJ-10 - Tuesday, September 6, 2011 - link
FWIW, I tried this some time ago and it didn't work for me. I must not have been patient enough, or my hand are too large, or something.I note that this sort of nonsense is not part of the Fong Kai cases that HP has used for a long time in their workstations. The bar simply is not necessary for a case to be solid or quiet.
MrMaestro - Tuesday, September 6, 2011 - link
I owned a first-gen SOLO in my previous setup and I loved it, though admittedly I didn't truly appreciate its qualities until I got rid of it. It was soooooo quiet, I would leave it on all night in my bedroom and in the dead of night I could only just make out that it was on. I've stopped doing that since I got my P183 because it makes too much noise, and that's with the TriCools swapped out for Scythes.This looks like a nice evolution of the old design, though there are a couple of things I'm disappointed about. Firstly, it looks good, but a bit boring. I had the Sonata Plus (which was a SOLO bundled with a PSU) which has a dash of orange on the front, and it looked great while being a tiny bit different. This plain black is a bit boring.
I also wish they would have moved the PSU to the bottom of the case, as the support bar is a bit of a pain, and out of place in a modern, name-brand case I think.
I will definitely look into this for my next build though. Thanks for the review AnandTech.
Menty - Tuesday, September 6, 2011 - link
Nice review, thanks :).Did notice you mentioned the PSU-installation difficulty. I saw it mentioned elsewhere that the bracing bar would be removable in the Solo II, and indeed it looks from the photos like it has screws instead of rivets on it. Could you check that? :) It might make a substantial difference to the build difficulty for some people.
Dustin Sklavos - Tuesday, September 6, 2011 - link
The PSU support bar has a screw in the back of the case, but unfortunately uses rivets to attach to the optical drive cage. :(Menty - Tuesday, September 6, 2011 - link
Well that sucks :( thanks for replying though.Dustin Sklavos - Tuesday, September 6, 2011 - link
Double-checked, this is my error. The case uses small phillips head screws, not rivets. The crossbar can be removed!soydios - Tuesday, September 6, 2011 - link
So, how would it perform with both intake fan slots populated with low-speed fans, acoustically and thermally?This case meets all of my requirements for a new case besides thermals, thus I'm curious to try it with two added intake fans.
- full ATX
- 3x HDD mounts w/ vibration isolation
- 1x 5.25" bay
- sound-deadening panels
- intake air filter(s)
- good selection of front ports
nowayout99 - Tuesday, September 6, 2011 - link
The noise is dependent on the fans you select. This case, like the original Solo, gives you just about every advantage you can have, but the part selection is up to you. Get quiet parts and you will have something you can barely tell is on.This review does not include any front intake fans, so any front fans you add will only improve thermals. Unless you are doing SLI or Crossfire, the thermals will be well within operating spec for the components. Again it'll come down to part selection. Low-speed fans will be silent inside this case.
jwaight - Tuesday, September 6, 2011 - link
Dustin, could you install 2 intake fans and redo the thermals again?I know you test the shipping unit, but who wouldn't populate the intakes?
flipmode - Tuesday, September 6, 2011 - link
Nice review. Nice to see Antec trying to recover from the follies of recent Sonata models.I have a Sonata III and I really do like it. But there are some things Antec has not addressed that I don't understand.
1. Bottom mounted PSU. This is almost a necessity IMO. It helps with cable management since excess cables don't have to defy gravity with bottom mounted PSUs. This might make very long graphics cards incompatible with the case since a bottom mounted PSU would push the mobo upward and therefor the graphics card upward into the drive cage, but I'd be willing to accept that compromise. If you're a gamer then get a gamer case.
2. Side-facing drive sleds. This is a necessity. You can skip the cable management hooks if you have to in order to get the sleds to face sideways. The ease of use of side-facing sleds is a tremendous convenience over the front facing scheme. Also, Antec's designers should consider how the cables route to the drives. In the Sonata III the cables can be routed in a pretty clean manner but I think that it more from luck than any strenuous thought on the part of the case designers.
3. Tri-cool is better than dual cool. I have the Tri-cool fan and I love it. It's a terrific fan. And include the fans at the front of the case too - even if it means charging a little more.
4. The cross-bar must go. It's a coincidence, but just this past Sunday I spent 30 minutes with a drill removing the cross-bar from my Sonata III so that I might possibly be able to get a PSU in and out of the case without removing the CPU heatsink. And the case is plenty sturdy without it. The side panel goes on and off easier without the cross-bar.
Well, now for some compliments:
1. The sound attenuation is a wonderful thing to see and Antec should keep that up and in as many of their cases as possible.
2. The understated look of the case is quite nice and approaching beautiful. That is first and foremost what has always drawn me to the Sonata line and now Fractal's cases too.
3. The cable routing space behind the mobo and the cut-outs in the mobo tray are absolute must-have features these days and kudos to Antec for including those.
4. I also like that there is no handle on the side of the case like there is on the Sonata. And I love the fact that there is no side vent. Side vents are ugly, and cases should achieve adequate air flow without them. Good job there!