Antec Solo II Review: Sonata Evolved
by Dustin Sklavos on September 6, 2011 12:00 AM EST- Posted in
- Cases/Cooling/PSUs
- Antec
- mid-tower
- Sonata
Assembling the Antec Solo II
While Antec has made a lot of strides in at least trying to make the Solo II easy to assemble, I'm not going to lie: I was pretty much dreading actually putting it together once I opened it up. Difficult assembly doesn't necessarily a bad case make (Ed: Says Yoda?); SilverStone produces some incredible cases, but half of the time you don't build them, you solve them.
Ordinarily I'd start by mounting the motherboard, but in the Solo II the absolute first thing you should install is the power supply. SilverStone's Temjin TJ08-E wasn't exactly easy to build either (top-mounted PSUs just seem to be problematic this way), but heaven help you if you ever need to replace your PSU once you've built a system inside the Solo II because you're just not going to be able to fit it around your heatsink. Thankfully the power supply went in alright, and Antec preinstalls most of the mounts for an ATX motherboard by default. The PSU and motherboard were pretty much the easy part.
Update: The Solo II ships with philips head screws attaching the PSU support bar on all sides, so you'll be able to remove the power supply without dismantling the rest of the enclosure.


Antec stashes the drive rails for the two 5.25" drive bays in the bottom of the case, a welcome change that keeps them readily available so that Antec's customer service doesn't have to gracefully send you free replacements (note: they've done that for me as a regular tax-paying ninja before I started doing these reviews). To install the 5.25" drive, along with anything using the 3.5" drive mounts, you'll need to remove the front panel. There are three levers on the inside of the enclosure that you press in, and the front panel actually swings outward on hinges. You're better off just lifting it off and removing it, though.
As much as I appreciate the rails for the optical drive, I've noticed they don't line up quite perfectly by default (you'll see in my completed build that the ODD is recessed), but the real question I have is why this isn't a tool-less installation to begin with. Virtually everybody else has graduated to a tool-less or near-tool-less mounting system for optical drives, but these rails are the exact same ones I installed on my friend's CD burner back when I assembled her AMD Athlon XP 2500+ machine. I wish that were an exaggeration. This needs to be updated desperately.
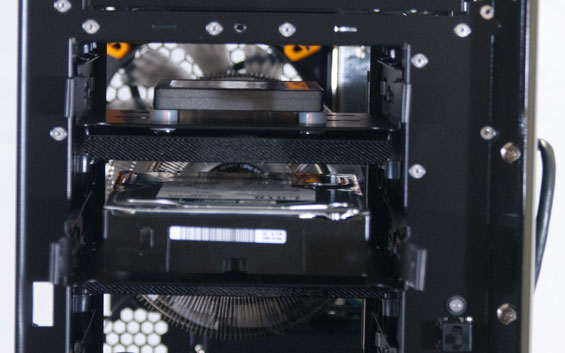
The press materials suggest hard drives are easy to install and upgrade, but don't you believe it. You have to remove the front panel, then unscrew a hinged ventilation grate (also capable of holding a 120mm intake fan) to get to the drive mounting system. From there you can either strap a 3.5" drive in with the suspension system (I'm not a fan), or you can remove the drive sleds and do it that way. I prefer the drive sleds as they include silicone grommets and can support both 3.5" drives and 2.5" drives. As a nice feature, you still use the grommets for mounting 2.5" drives, a reminder that 2.5" mechanical hard drives still exist (something other case manufacturers often forget), though we'd generally recommend 2.5" SSDs for desktop systems.
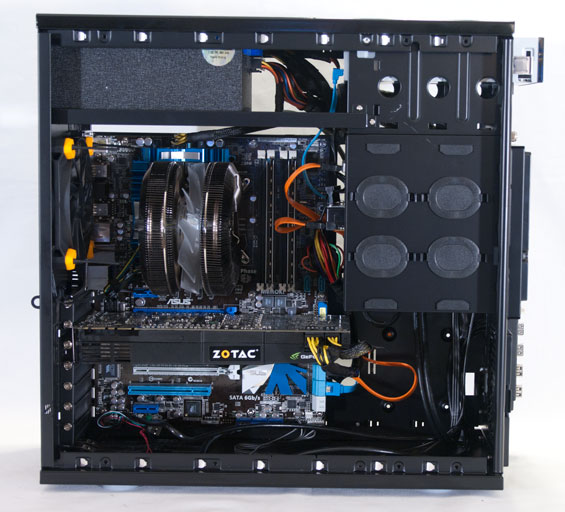
Finally, installing the video card was easy enough (as it usually is), but Antec uses old-fashioned screws for mounting instead of thumbscrews. Honestly I'm not sure I care that much either way; I'm terribly frail and generally just don't have the strength to twist thumbscrews unless I'm in a hurry, and I always wind up using a screwdriver anyhow. Cabling was a red nightmare, though, and again I have to stress: modular power supplies are your friend.
I'm keen to point out that SilverStone sent me a little dongle to try out and I've wound up using it in the last two case tests. This cable converts one SATA power cable into four in a neat line, and it is fantastic.


59 Comments
View All Comments
Exodite - Tuesday, September 6, 2011 - link
Seems my previous attempt at a reply got eaten so I'll try again.Re: Samsung HDDs.
I've used both a 400GB T133 and a 2TB F4 Ecogreen in the original SOLO, both on suspension and using the silicone grommet mounts.
When using Samsungs tools to set AAM to 'Quiet' or whatever the lowest setting is, and avoiding tightening the screws through the silicone grommets too much, I can hear no audible difference between the two mounting systems.
This from a guy who find his Noctua C-14 intolerable on everything past 750 RPM.
ya_bewb - Sunday, January 8, 2012 - link
I have two Solo cases, like Exodite, I can''t hear any difference between the silicon and the bands. I've since settled on just using the silicon mounts, which prevent any metal on metal contact. I agree with the reviewer, the bands are unnecessary, and in version 2 they should have dropped them and added another 2.5" drive bay with the space savings.I have one of my current drive bays empty because the video card power connector juts into the space in front of it, so I have to agree with that change in the version 2. If you want to build a quiet mid-range gaming PC it is difficult with the original solo, just too crowded for the video card.
People have complained about the power switch and neither is broken in either of my cases, maybe I'm just lucky.
Lastly, the Fractal Define R3 is a comparable case but after seeing one in person the build quality doesn't seem as good as the Solo...and I'm not a huge fan of the drive bay door on the front. Even so I'm considering it for my next rig, as well as the solo 2 and a couple of other cases. The Solo may be more expensive due to the paint job, it is a good looking case.
alandpost - Tuesday, September 6, 2011 - link
(from a happy multiple Solo I builder)The reviewer has rather missed the point.
The HD suspension really does make a difference, particularly in reducing vibration from 3.5" drives. If you've got whining blowers on big graphics cards, you might not notice.
The lack of noise is the partially the result of the indirect air intake, not just the sound dampening panels. Also, if the build quality of the Solo II is similar to the Solo I, it's a solid brick of steel that doesn't rattle or hum as much as many other cases.
Thermals would improve with slow, good-quality intake fans, without becoming noisy. In fact, the lower temperature might slow down the fan on the graphics card.
The moaning about HD installation just sounds childish to me. We're talking about an operation that takes thirty seconds.
Also, it seems that the reviewer is unaware of the original Solo case, which has been out since 2006 or 2007, and has been a standard choice for quiet builds ever since.
I agree that the Solo II is not the best choice for a 500W system -- something like the InWin BUC will move way more air -- but how many such builds actually exist? For the build tested, the "load" numbers are also not typical of any load you'd actually use, running both prime95 and furmark.
For a modestly powered build, the only drawbacks I can see in the Solo II are the small HD cage, and the price.
For reviews more in tune with the issues of quiet computing, head over to silentpcreview.com
Dustin Sklavos - Tuesday, September 6, 2011 - link
I don't think I've missed the point. I'm not personally a fan of the suspension system and have rarely had a situation that basic rubber grommets didn't solve the problem of. I don't care for it, and the half one, half other approach actually just winds up reducing the enclosure's overall usefulness.And it's true, the Solo II is very solidly built. My Graphite 600T developed a rattle over time that drove me insane.
I believe I also said that for someone looking for pure silence at any cost, the Solo II was pretty much going to be the best choice.
That in mind, I will tell you right now that builds like our testbed aren't as uncommon as you think they are. The load numbers are also more typical than you'd think: I found when encoding H.264 video using Adobe Media Encoder, my core temperatures were usually within a degree or two of my Prime95 temps.
For a more modest build the Solo II is going to be just fine. It'll run a little warmer than the other enclosures will, but it has a solid build and it's dead silent (a quieter HSF wouldn't hurt either.) Our stock test results support this.
But every time someone mentions SPCR here I die a little inside. SPCR is a niche site and extremely specialized, with expensive specialized equipment and very specific goals tailored to a very specific audience. I can only do the best with what I have and recount my personal experiences with the hardware sent to me to the best of my ability, and sometimes those results and experiences will contradict SPCR. So be it.
HammerSandwich - Wednesday, September 7, 2011 - link
IMO, Anandtech is the best overall tech site out there, so I understand your frustration at the SPCR comparisons. But, as you point out, SPCR's a highly specialized site, and we should expect that allows it to do certain things a bit better.Having said that, I generally do prefer SPCR's case reviews, for reasons that have little to do with more precise SPL measurements. Here are a few areas they nail which you could implement easily:
1) Report (at least the major) fan speeds.
2) Report the test PC's power draw in idle & load tests.
3) Run additional tests at a lower heat load. This test's non-OCed results occur at a pretty high power level (certainly compared to, say, a 2500K & 6870), and even hardcore gamers often have less extreme secondary rigs. There's room to evaluate cases in the 150-200W range, which *seems* like what Antec designed the Solo II to handle. But that's hard to determine from your review.
4) Report temperatures in both C and F. Right now, your ambient & test results are in different units.
5) Finally, and very much IMO, I saw some potential bias/frustration in this review. Your comments about disliking the drive suspension and "...I'm not personally a fan of design decisions that force those kinds of trade-offs..." make me wonder if you're evaluating this case on its own merits or simply for how well it suits your personal needs. ALL cases have design trade-offs, and a review needs to accomodate them to a certain extent.
So, while your conclusion appears solid, you essentially tested the case in an enthusiast/gamer context & extrapolated that "it'd probably be adequate" in less demanding use. I believe Anandtech can do better, and I hope these comments help it to do so.
Dustin Sklavos - Tuesday, September 6, 2011 - link
And while I'm at it, you'd do well to note SPCR does load testing using the exact same software we do.a176 - Tuesday, September 6, 2011 - link
As a Solo owner myself, I totally disagree with you. Over the years, what I've learnt to hate about the case:Adding drives does not take 30 seconds, please. Unscrew the side panel, unlatch the front panel, unscrew and unhinge the front fan holder (which can't go very far unless you disconnect the fan wiring first) ... compared to just removing the side panel on most modern cases? Yea.
The suspension itself is a frilly extra as well; it does not make the drive any quieter than the rubber grommets.
Another thing is that damn support bar that goes across the case from just under the PSU. It might not effect you, but I have a Thermalright 120, and it barely fits in because of that damn bar (LGA775). By barely, I mean I have to pivot in the entire motherboard+cooler under the bar to do the installation.
If you can imagine, the 120 is pretty small by todays standards. You will never be able to get in one of those larger modern heatsinks.
Thanks to that bar alone, it makes working around inside an already small case extremely difficult. I can't believe that dumb thing is still in this "new" version. Why couldn't they just move the PSU to the bottom?
I love the Solo based on aesthetics, its small size, and fairly silent. But its terribly designed. And so is the new one. There are much better, cheaper, options on the market now.
DrJ-10 - Tuesday, September 6, 2011 - link
I agree with this 100%. One example: one computer I maintain lost its power supply a week ago. Everything -- *everything* -- has to be removed from the case to swap it out, and that includes the ungainly drive removal described above. Of course the computer has a Thermalright 120 on it, so getting the motherboard out is a PITA.I'm pleased that there is more room for cables behind the motherboard. It is great that a full-sized video can now be used (though losing drive space is the wrong way to do it). But the blasted bar under the power supply still remains.
I love the results I get from the case. But I won't buy another one until they do a better job than they have done with this revision.
JaBro999 - Tuesday, September 6, 2011 - link
One more Antec Solo (P150 variant) owner who has suffered from the inability to remove the power supply without taking everything out of the case first. When my PSU fan developed a rattle, I had to dissasemble my system to get the damn PSU out, and my Zalman cooler is smaller than the TRUE 120.An EASY fix for this design flaw would be to take a page from many Lian-Li's cases, and have the PSU attach to a removable mounting plate that itself is attached to the rear of the case. You would simply unscrew the PSU mounting plate and pull the PSU out of the back of the case.
However, this issue might be addressed with the Solo II, as Jared has replied to a comment lower down that the bar blocking the PSU might be removable:
RE: PSU support bar by Dustin Sklavos on Tuesday, September 06, 2011
Double-checked, this is my error. The case uses small phillips head
screws, not rivets. The crossbar can be removed!
WaffleTech - Tuesday, September 6, 2011 - link
You forced me to register ;-)I'm a SOLO owner and the system is a S775 build using a Noctua NH-U12P which is a bit bigger than the Thermalright 120 if I'm right. I had to swap out the PSU two times and there is in fact a nifty method that at least let's you keep the mainboard in the case and even the cooler may stay mounted.
Your clear out all four 5,25" drive bays which is pretty quickly done thanks to the quick mount rails. Next you remove the CPU fan from the cooler. Then you remove all PSU cables from their connectors and put them out through the big front hole provied by the empty drive bays. Now you unscrew the PSU and the space will be very tight but you can actually tilt it 90 degrees in the free room just between the CPU cooler and the drive bays. At last you can pull out the whole stuff to the front.
This still isn't nice but at least most of the system stays where it is.