NZXT H2: Not Quite Quiet
by Dustin Sklavos on May 26, 2011 2:43 AM EST- Posted in
- Cases/Cooling/PSUs
- mid-tower
- NZXT
Assembling the NZXT H2
Starting with the motherboard, I was a little disappointed not to find stand-offs already in place. I've seen a couple of manufacturers build them right into the tray (which is frankly ideal), and at a point in the industry where pretty much everyone has standardized on mounting hole placement in motherboards this would've been nice. On the flipside, though, NZXT includes a socket with a phillips head that makes installing the stand-offs substantially easier. Getting the I/O shield and motherboard in was fairly painless, though I do wish NZXT had made the heatsink cutout in the motherboard tray a little wider: if you visit the gallery you'll see the backplate for our heatsink is slightly covered up.


There are two steps in computer assembly that I hate more than anything else: connecting the case headers to the motherboard, and routing the 12V AUX cable (which we'll get into in a bit). The headers for the buttons and LEDs are already irritatingly small and standardized in the most consumer-unfriendly way, but NZXT inexplicably opts not to use the traditional color-coding. The cables in the headers are black, and black with white stripes. My mental shortcut has always been "the color is the positive, the white is the ground". I looked at these cables and was instantly confused, and thus reacted in the same fashion most other white guys do in that situation: anger and fear. If the power LED hadn't been split into two separate headers with a "+" and "-" on them I would've had no idea at all how NZXT had color-coded these. It's completely unnecessary, as the case lacks a window so no one will see if your case headers are a matching black or not.
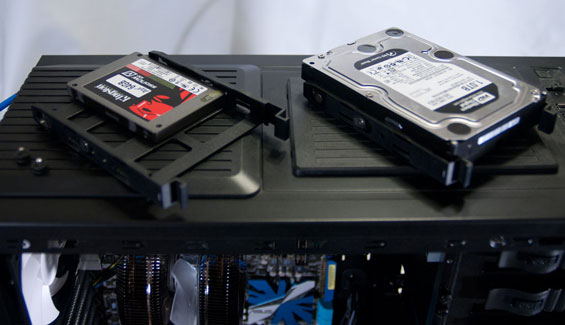
Installing the drives took a little bit of work, but nothing unreasonable or unusual. Removing the covers for the 5.25" bays is a breeze, but note that they aren't entirely toolless: while the main side has plastic studs that snap in and lock the drive into place, the other side isn't secured at all, so you'll probably want to use thumbscrews to keep it from wobbling. The 3.5" drive trays can be a little fussy since you have to basically flex them to snap the studs into the drive's mounting holes, but I found it fairly easy to jimmy the drive in and out of the tray with a small flathead screwdriver. The trays also have mounting holes in the bottom for 2.5" drives, but you'll need to screw those in manually, which is par for the course for almost any enclosure.
![]()
When you install expansion cards, you're going to note that there are some potential clearance issues. Our GeForce GTX 580 butted up against the cables connecting our SSD; we were able to get everything in, but it was a tight fit. If you use a longer card you're going to have to sacrifice a couple of drive bays to get it. Since NZXT offers you a staggering eight that shouldn't be a serious problem, but it's something to keep in mind. Likewise, because of this clearance trouble, side-mounted SATA ports on motherboards are going to be somewhat cramped.
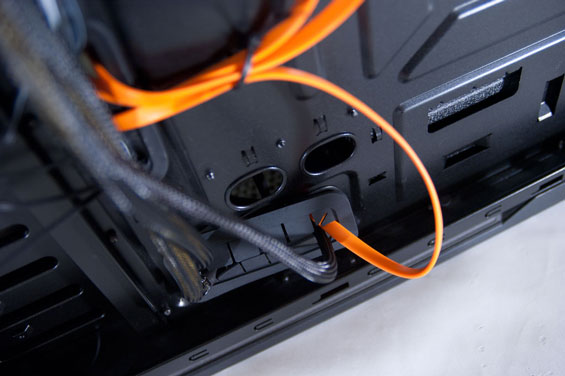
Finally, installing the power supply and wiring the insides resulted in a couple of nagging issues. I had a little trouble lining up the power supply correctly, but that's not a big deal. This is where I discovered that the rubber linings for the mounting holes in the motherboard tray aren't actually secured to it in any way. Routing the main power cable to the motherboard inevitably requires using at least a little force, and routing all of these cables through the rubber lining actually caused the rubber lining to come off. Thankfully the holes themselves are rounded off so they aren't going to start cutting the cables (or you), but a little glue here would've been appreciated.
And of course, getting the auxiliary 12V cable plugged into the motherboard has alwats been an exercise in bloodletting. I love Zalman's CPU coolers and have been a big fan for years, but I've tended to colloquially refer to having to "make sacrifices to Zalman the Blood God." This is because whenever I've had to work in a case with low clearance (like the H2), I've inevitably carved up my hands on Zalman's heatsinks like a moron while trying to install the auxiliary 12V cable. Clearance between the top of the motherboard and the top of the case appears to be particularly low in the H2, and I'm not sure how end users are supposed to do this with any kind of ease with a 140mm fan installed.
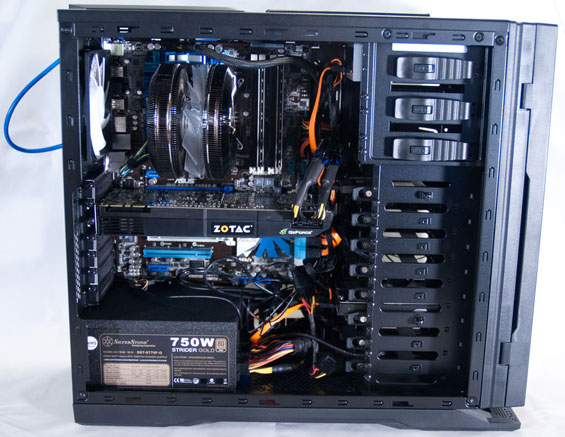
Ultimately the assembly went fairly well, though. Most users may want to simply remove the rubber linings from the motherboard tray altogether, and I can't stress enough how much easier a modular power supply can make your life; that's just true of any build in any case.


19 Comments
View All Comments
SquattingDog - Thursday, May 26, 2011 - link
I was quite looking forward to seeing how this case faired, as the H1 Hush was decent and quiet overall. The H1 Hush looks like it may have had more intake capabilities, with around half of the front 120mm fan exposed.Perhaps this case would be ideal for standard builds, but just not cut out for the job of a high-performance gaming machine, given it's comparatively low airflow characteristics.
I agree that the asthetics are decent for the price-level, and the dampening foam and internal build quality definitely has an appeal...what a pity NZXT didn't sort out the intake capabilities...
sometaken - Thursday, May 26, 2011 - link
I assume anandtech will be testing more cases in the future. I would like to see how the Fractal Design Define R3 stacks up against this NZXT offering and vs. the P183. It is very similar in design and sells at the same price point of the NZXT. However it looks to offer better cooling yet still provide silent operation.EnzoFX - Thursday, May 26, 2011 - link
SPCR has a great review on the Define R3.Regarding the review, a noise floor of 32db is too damn high. I'll take your noise assessment seriously when you get under 16db.
JarredWalton - Thursday, May 26, 2011 - link
Under 16dB? Really? That would require a serious investment in testing equipment and facilities, because you're not going to get to that level otherwise. I have a somewhat better SPL meter compared to Dustin, and when my house is completely silent I've gotten measurements as low as 28dB. Even the slightest noise at that level (e.g. a bird chirping outside, a passing car or plane, etc.) will increase the level to 30-32dB.Regardless, all of the cases are measuring above 34dB in our tests, so while that might be slightly higher than you could measure with a different test location and better equipment, the scores are relative to each other and show a clear difference. If Dustin gets a case that doesn't register above the noise floor, then there's more to complain about.
hechacker1 - Thursday, May 26, 2011 - link
As an owner of the Fractal Design R3, I can say overall it's a nice case, especially for hard drive and cable management.It's touted as a silent pc, and indeed, it is much quieter than my former Lian Li case it replaced. However, it's not silent in the truest sense, it's clearly audible over background noise.
But then I have a gaming rig in it, so I don't expect it be to silent, just quiet, which it does really well.
I would like Anandtech to tackle the R3, and perhaps their newer Arch series, which looks like an slightly fixed version.
The only thing the R3 lacks is USB3.0, and more space behind the mobo tray.
jrs77 - Thursday, May 26, 2011 - link
If you want to build a silent PC, then there's no better cases around then the Define-series from Fractal Designs. They changed the dampening-material from bitumen to something foamy that doesn't smell anymore a while ago and their internal layout is clean and efficient.Having only two 5.1/4" bays in the R3 and Mini is very welcome in that regard.
doctormonroe - Thursday, May 26, 2011 - link
Hopefully this site will test this power supply and release a review of it in the not too distant future.kasseren - Thursday, May 26, 2011 - link
To me it looks like you'd be better of buying the Fractal Design Define R3 or if you want silence and design more the new Cooler Master Silencio 550 that both seem to be in the same price range.jasonnovak - Thursday, May 26, 2011 - link
I have this case and really like it. The last page of the SPCR review shows how to widen the slot on the bottom of the door for more air intake, though they didn't retest it. I haven't had any overheating issues on mild overclock i5-2500k but I think I may break out the dremel and give it a tryAffectionate-Bed-980 - Thursday, May 26, 2011 - link
If you're going to review a case every 2 years, then how do you compare data?How about comparing this to a P182 or P183 or a R3?